Here is the code how to revers word or words in Visual Basic 2015 (all versions) and return the result in TextBox.
Dim yourword As String = "test word"
Dim revyourword As String = StrReverse(yourword)
TextBox1.Text = revyourword
Get more tutorials about TextBox control in Visual Basic 2015.
Friday, December 2, 2016
Saturday, November 12, 2016
How to make a simple To Do List Software in Visual Basic 2015
To make a simple To Do List in Visual Basic 2015 I will use a listbox and several buttons and one textbox.
1. Start a new Visual Basic 2015 project! This apply for the older .net versions.
2. Create the form and set it up!

Now let set the properties of the form.
In the form properties change the sizes, width = 500 and height = 500.

Change in Properties the title of the form as "Simple To Do List".

3. StatusStrip Control Setting Up. In the StatusStrip create a label where we will present how many tasks we have to do in the moment.
 We create a lable within the StatusStrip as it's shown on the above picture. Default property name for the created label is ToolStripStatusLabel1. This is not practical to work with so we will change it to lblTasksCount.
 We have the following view.
 You can see that the label text of our ToolStripStatusLabel is ToolStripStatusLabel1. We will delete this text.

4. ToolStrip Control Setting Up.
Let create our first button and our first textbox withing the ToolStrip Control.

Now we will name the button and textbox.
ToolStripButton1 Name = btnAddTask (coded version)
ToolStripButton1.Text = "Add Task"
The same way we change Text Property to "Add Task"
We will also add an icon to the button property. We do this when we go with the mouse pointer over the button control and perform right click on the mouse and click "Set Image".
See the photo bellow:

When it comes to downloading icons I always use Iconfinder.com. You can find wonderful premium and free icons there.

Right from the button is the textbox.
Change the property name from ToolStripTextBox1 to txtAddTask. Use the same way as for ToolStripButton.
Let's change the font and the size of ToolStripTextBox1.

Set the font to 16pt.
Change ToolStripTextBox1 size!

For our project we will change only Width to 200.
Let's add the other buttons! From designing perspective we will add Separator at first.

Add the buttons following to look like the image bellow!
Use the previous explained ways to set the following properties for each of the controls.
- Button2.Name = btnEdit
- Button3.Name = btnRemove
- Button4.Name = btnOpenTaskList
- Button5.Name = btnSaveTaskList
5. Start codding the software!
First change the font of the Task List to 16. Same ways as for the previous controls.
Because in ToolStripTextBox have no Focus (not as the old way), we will write a special code when the form load.
With this code the cursor will be focused in the textbox so we can start writing the task immediately.
You can try to add some tasks now!
Let enter the code in btnEditTask!
Edit and Remove selected tasks from the List Task is programmed.
Now we will add the codes for Open Task List and Save Task List.
Our "Simple To Do List Software" is finished. In my next post I will add advanced options to the software so we can make it complete To Do List Software.
Some of the source codes I used are taking from one of my previous posts "ListBox Complete Tutorial - Visual Basic 2015".
1. Start a new Visual Basic 2015 project! This apply for the older .net versions.
 |
| Start a new project |
2. Create the form and set it up!
Now let set the properties of the form.
In the form properties change the sizes, width = 500 and height = 500.
Change in Properties the title of the form as "Simple To Do List".
3. StatusStrip Control Setting Up. In the StatusStrip create a label where we will present how many tasks we have to do in the moment.

4. ToolStrip Control Setting Up.
Let create our first button and our first textbox withing the ToolStrip Control.
Now we will name the button and textbox.
ToolStripButton1 Name = btnAddTask (coded version)
 |
| ToolStripButton1 Name visual version |
The same way we change Text Property to "Add Task"
We will also add an icon to the button property. We do this when we go with the mouse pointer over the button control and perform right click on the mouse and click "Set Image".
See the photo bellow:
When it comes to downloading icons I always use Iconfinder.com. You can find wonderful premium and free icons there.
Right from the button is the textbox.
Change the property name from ToolStripTextBox1 to txtAddTask. Use the same way as for ToolStripButton.
Let's change the font and the size of ToolStripTextBox1.
Set the font to 16pt.
Change ToolStripTextBox1 size!
For our project we will change only Width to 200.
Let's add the other buttons! From designing perspective we will add Separator at first.
Add the buttons following to look like the image bellow!
 |
| Simple To Do List |
- Button2.Name = btnEdit
- Button3.Name = btnRemove
- Button4.Name = btnOpenTaskList
- Button5.Name = btnSaveTaskList
5. Start codding the software!
First change the font of the Task List to 16. Same ways as for the previous controls.
Because in ToolStripTextBox have no Focus (not as the old way), we will write a special code when the form load.
Private Sub Form1_Load(sender As Object, e As EventArgs) Handles MyBase.Load
Me.ActiveControl = txtAddTask.Control
End Sub
With this code the cursor will be focused in the textbox so we can start writing the task immediately.
Private Sub btnAddTask_Click(sender As Object, e As EventArgs) Handles btnAddTask.Click
'Check if txtAddTaskBox is Null or Empty to avoid adding empty task
If String.IsNullOrEmpty(txtAddTask.Text) Then
MsgBox("Write your task before adding it to the Task List", vbCritical, "Empty TaskBox")
Else
'Add task in the Task List
ListBox1.Items.Add(txtAddTask.Text.ToString)
'Clear the task textbox
txtAddTask.Clear()
'Focus the task textbox
txtAddTask.Focus()
'Count Due Tasks in the Task List
lblTaskCount.Text = "Due Tasks: " & ListBox1.Items.Count
End If
End Sub
You can try to add some tasks now!
 |
| Simple Task List in action |
Let enter the code in btnEditTask!
Private Sub btnEdit_Click(sender As Object, e As EventArgs) Handles btnEdit.Click
Dim selecteditemindex As Integer = ListBox1.Items.IndexOf(ListBox1.SelectedItem)
Dim editaskinput As String
Dim Item As Object = ListBox1.Items.Item(selecteditemindex)
Dim index As Integer = ListBox1.Items.IndexOf(Item)
editaskinput = InputBox("Edit the Task", "Edit selected Task")
ListBox1.Items.Remove(ListBox1.SelectedItem)
ListBox1.Items.Insert(index, editaskinput)
End Sub
Private Sub btnRemove_Click(sender As Object, e As EventArgs) Handles btnRemove.Click
Dim itemfordeletion
itemfordeletion = ListBox1.SelectedItem
ListBox1.Items.Remove(itemfordeletion)
End Sub
Edit and Remove selected tasks from the List Task is programmed.
Now we will add the codes for Open Task List and Save Task List.
btnOpenTaskList.Click
Dim OpenFileDialog1 As New OpenFileDialog
OpenFileDialog1.FileName = ""
OpenFileDialog1.Filter = "Text Files (*.txt)|*.txt|All Files (*.*)|*.*"
If OpenFileDialog1.ShowDialog() = DialogResult.OK Then
Dim lines = File.ReadAllLines(OpenFileDialog1.FileName)
ListBox1.Items.Clear()
ListBox1.Items.AddRange(lines)
End If
End Sub
Private Sub btnSaveTaskList_Click(sender As Object, e As EventArgs) Handles btnSaveTaskList.Click
Dim SaveFileDialog1 As New SaveFileDialog
SaveFileDialog1.FileName = ""
SaveFileDialog1.Filter = "Text Files (*.txt)|*.txt|All Files (*.*)|*.*"
If SaveFileDialog1.ShowDialog() = DialogResult.OK Then
Dim sb As New System.Text.StringBuilder()
For Each o As Object In ListBox1.Items
sb.AppendLine(o)
Next
System.IO.File.WriteAllText(SaveFileDialog1.FileName, sb.ToString())
End If
End Sub
Our "Simple To Do List Software" is finished. In my next post I will add advanced options to the software so we can make it complete To Do List Software.
Some of the source codes I used are taking from one of my previous posts "ListBox Complete Tutorial - Visual Basic 2015".
Thursday, November 10, 2016
Add Items to ListView Columns in Visual Basic 2015
 |
| Add Items to ListView Columns in Visual Basic 2015 |
I have 2 textboxes, txtUsername and txtPassword
Dim item As New ListViewItem(txtUsername.Text)
item.SubItems.Add(txtPassword.Text)
ListView1.Items.Add(item)
In the next post I will teach you how to remove items from ListView in Visual Basic 2015.
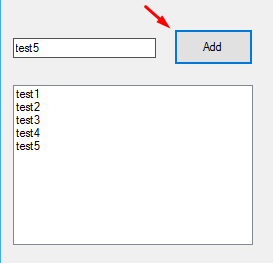
Limit the number of items to add in a ListBox in Visual Basic 2015
In this blog post you will learn how to limit the number of items someone can insert in a ListBox.
Let say you have a task to limit the entrance of items to be 5. Here is the source code:
Dim item As Integer
item = TextBox1.Text
If Not ListBox1.Items.Count = 5 Then
ListBox1.Items.Add(item)
Else
MsgBox("You already entered 5 grades")
End If
Very simple and clean code.
Let say you have a task to limit the entrance of items to be 5. Here is the source code:
Dim item As Integer
item = TextBox1.Text
If Not ListBox1.Items.Count = 5 Then
ListBox1.Items.Add(item)
Else
MsgBox("You already entered 5 grades")
End If
Very simple and clean code.
Calculate average of numbers in a ListBox in Visual Basic 2015
 |
| Calculate average of numbers in a ListBox in Visual Basic 2015 |
Here is the source code:
Dim AllNumbers As Double = 0
Dim Current As Double = 0
Dim Average As Double = 0
For i As Integer = 0 To ListBox1.Items.Count - 1
AllNumbers += Val(ListBox1.Items(i))
Current += 1
Next
Average = AllNumbers / Current
TextBox2.Text = Average.ToString
Wednesday, November 9, 2016
Insert Picture in RichTextBox in Visual Basic 2015
 |
| Insert Picture in RichTextBox in Visual Basic 2015 |
Try
Dim GetPicture As New OpenFileDialog
GetPicture.Filter = "Bitmaps (*.bmp), GIFs (*.gif), JPEGs (*.jpg)|*.bmp;*.gif;*.jpg|Bitmaps (*.bmp)|*.bmp|GIFs (*.gif)|*.gif|JPEGs (*.jpg)|*.jpg"
GetPicture.FilterIndex = 1
GetPicture.InitialDirectory = "C:\"
If GetPicture.ShowDialog = DialogResult.OK Then
Dim SelectedPicture As String = GetPicture.FileName
Dim Picture As Bitmap = New Bitmap(SelectedPicture)
Clipboard.SetImage(Picture)
Dim PictureFormat As DataFormats.Format = DataFormats.GetFormat(DataFormats.Bitmap)
If txtNote.CanPaste(PictureFormat) Then
txtNote.Paste(PictureFormat)
End If
End If
Catch ex As Exception
'The only exception that can occurs if the richtextbox
'not supports the picture format
MsgBox(ex.Message, MsgBoxStyle.Critical, "Error")
End Try
You see, you can insert jpg, bmp and gif. If you need to insert other types of pictures just import them as on the example.
If any questions feel free to contact me.
Sunday, October 23, 2016
Resize Images In VB.NET
This code can be used to resize images in Visual Basic 2015 too.
Try
SaveFileDialog1.Filter = "JPEG|*.jpg"
If SaveFileDialog1.ShowDialog = DialogResult.OK Then
Using bm As New Bitmap(PictureBox1.Image, 1024, 500)
bm.Save(SaveFileDialog1.FileName, System.Drawing.Imaging.ImageFormat.Jpeg)
bm.Save(PictureBox1.SizeMode = PictureBoxSizeMode.StretchImage)
End Using
MsgBox("Your File Created")
End If
Catch ex As Exception
End Try
1024, 500 cab be intered trough textboxes too
Try
SaveFileDialog1.Filter = "JPEG|*.jpg"
If SaveFileDialog1.ShowDialog = DialogResult.OK Then
Using bm As New Bitmap(PictureBox1.Image, txtbox1.Text, txtbox2.Text,)
bm.Save(SaveFileDialog1.FileName, System.Drawing.Imaging.ImageFormat.Jpeg)
bm.Save(PictureBox1.SizeMode = PictureBoxSizeMode.StretchImage)
End Using
MsgBox("Your File Created")
End If
Catch ex As Exception
End Try
Try
SaveFileDialog1.Filter = "JPEG|*.jpg"
If SaveFileDialog1.ShowDialog = DialogResult.OK Then
Using bm As New Bitmap(PictureBox1.Image, 1024, 500)
bm.Save(SaveFileDialog1.FileName, System.Drawing.Imaging.ImageFormat.Jpeg)
bm.Save(PictureBox1.SizeMode = PictureBoxSizeMode.StretchImage)
End Using
MsgBox("Your File Created")
End If
Catch ex As Exception
End Try
1024, 500 cab be intered trough textboxes too
Try
SaveFileDialog1.Filter = "JPEG|*.jpg"
If SaveFileDialog1.ShowDialog = DialogResult.OK Then
Using bm As New Bitmap(PictureBox1.Image, txtbox1.Text, txtbox2.Text,)
bm.Save(SaveFileDialog1.FileName, System.Drawing.Imaging.ImageFormat.Jpeg)
bm.Save(PictureBox1.SizeMode = PictureBoxSizeMode.StretchImage)
End Using
MsgBox("Your File Created")
End If
Catch ex As Exception
End Try
Friday, October 14, 2016
Restrict TextBox only to Numeric Input
Private Sub TextBox1_KeyPress(sender As Object, e As KeyPressEventArgs) Handles TextBox1.KeyPress
Select Case e.KeyChar
Case "0", "1", "2", "3", "4", "5", "6", "7", "8", "9", vbBack
e.Handled = False
Case Else
e.Handled = True
End Select
End Sub
Select Case e.KeyChar
Case "0", "1", "2", "3", "4", "5", "6", "7", "8", "9", vbBack
e.Handled = False
Case Else
e.Handled = True
End Select
End Sub
Monday, September 26, 2016
Visual Basic 2015 Tutorials: How to delete all records in Microsoft Access Database
I believe many programmers in Visual basic 2015 are asking themselves how to delete all records in a table at once without looping or similar.
Let say we have a Microsoft Access Database called "Test.accdb". We also have a table called "Test_Table". Let say the table has 5000 records and we need to delete all of them at once.
Here is the Visual Basic 2015 code?
Dim conn As OleDbConnection
Dim ClearAllData As OleDbCommand
conn = New OleDbConnection("Provider=Microsoft.ACE.OLEDB.12.0;Data Source=..\Test.accdb; Persist Security Info=False;")
Dim sql = "DELETE * FROM [Test_Table]"
conn.Open()ClearAllData = New OleDbCommand(sql, conn)ClearAllData.ExecuteNonQuery()
Visual Basic 2015 Tutorials: How to read the value from the last entry in ListView
Visual Basic 2015 Tutorials: ListView
Recently I worked on a Personal Information Management Software for a client and had to read the value from the last item in ListView control. Of course I haven't any problems by doing that but I knew that many beginners will have a problem with this simple task.I have a database where I insert a unique index in a database field. The most easiest way is to make it as a numbers such 1,2,3,4 etc. But what if I have 20 items and I delete 16 field. Then if you simply calculate it with ListView1.Items.Count + 1 will produce a mistake.
Here it is how I solved this problem.
Visual Basic 2015 Tutorials: Read the the value from the last entry in ListView control
Dim myindex As Integer
myindex = ListView1.Items.Item(ListView1.Items.Count - 1).Text
txtMyIndex.Text = myindex + 1
I hope you find this code useful. If any questions feel free to write in the contact form.
Friday, September 23, 2016
Create Keyword Density Calculator for SEO in Visual Basic 2015
Visual Basic 2015 Tutorials: Keyword Density Calculator
Visual Basic 2015 is very powerful programming language. You can create almost all type of software using it.We all know that if you want your website to be high in the search engine searches you need to SEO optimize your content. One of the best and most widely used way for SEO optimization is writing content with proper Keyword density. Proper keyword density should be between 2 and 3%.
Let's create keyword density calculator in Visual Basic 2015.

As you can see on the photo we have several textboxes.
Controls properties:
- .Name = txtKeyword
- .Name = txtWordsNo
- .Name = txtKeywordsNo
- .Name = txtPercent
- .Name = Label5
We have no buttons here because the calculation goes automatically in the time of writing. I added a menu so we can save the written SEO optimized text and open it later.
Visual Basic 2015 Tutorials: Writing the code
First we have to call System.IOImports System.IO
Private Sub TextBox1_TextChanged(sender As Object, e As EventArgs) Handles TextBox1.TextChanged
If txtKeyword.Text <> "" Then
Static rex As New System.Text.RegularExpressions.Regex("\b", System.Text.RegularExpressions.RegexOptions.Compiled Or System.Text.RegularExpressions.RegexOptions.Multiline)
txtWordsNo.Text = (rex.Matches(TextBox1.Text).Count / 2).ToString()
txtKeywordsNo.Text = FindWords(TextBox1.Text, txtKeyword.Text)
txtPercent.Text = Math.Round(txtKeywordsNo.Text / txtWordsNo.Text * 100, 2)
If txtPercent.Text > 1.5 And txtPercent.Text <= 3 Then
Label5.BackColor = Color.Green
Else
Label5.BackColor = Color.Red
End If
End If
End Sub
To make the software more useful I added a menu where I can open and save text files from the TextBox control in Visual Basic 2015.

Private Sub OpenToolStripMenuItem_Click(sender As Object, e As EventArgs) Handles OpenToolStripMenuItem.Click
OpenFileDialog1.CheckFileExists = True
OpenFileDialog1.CheckPathExists = True
OpenFileDialog1.DefaultExt = "txt"
OpenFileDialog1.FileName = ""
OpenFileDialog1.Filter = "Text Files (*.txt)|*.txt|All Files (*.*)|*.*"
OpenFileDialog1.Multiselect = False
If OpenFileDialog1.ShowDialog = DialogResult.OK Then
Dim oReader As New System.IO.StreamReader(OpenFileDialog1.FileName)
TextBox1.Text = oReader.ReadToEnd
End If
End Sub
Private Sub SaveToolStripMenuItem_Click(sender As Object, e As EventArgs) Handles SaveToolStripMenuItem.Click
SaveFileDialog1.DefaultExt = "txt"
SaveFileDialog1.FileName = ""
SaveFileDialog1.Filter = "Text Files (*.txt)|*.txt|All Files (*.*)|*.*"
SaveFileDialog1.FilterIndex = 2
SaveFileDialog1.RestoreDirectory = True
If SaveFileDialog1.ShowDialog() = DialogResult.OK Then
IO.File.WriteAllText(SaveFileDialog1.FileName, TextBox1.Text)
End If
End Sub
We finished the code. This code is perfect and it's not making any mistakes. If you want some changes or you want me to send you Visual Studio files or only as an exe file you can freely contact me in the contact form or by commenting. I will answer with pleasure.
My goal is to make this visual basic 2015 tutorials blog more useful as possible.
Tuesday, September 20, 2016
Create Simple Web Browser in Visual Basic 2015
Creating a Web Browser in Visual Basic 2015 is very easy task. Even if you are a novice in Visual Basic 2015 following the steps in my post you will be able to create it.
1) Open the Visual Studio 2015 and create a new Visual Basic 2015 project.
2) Second, go in the right bottom corner in Properties and find WindowsState. Change WindowsState in Maximized. That means when you start the application will start as maximized.

3) Little bit change the width and the height of the form. Make it wider and higher.
4) I suggest inserting a panel that will be docked on Top. This is because by default WebBrowser control will cover the entire form or if you dock it maximum will be little bit more than the half form. This will not give good look of the application.
So, go in Toolbox and choose Panel.

After you insert it in the form you will get the following.
 Now let dock it. Click on the panel and go in the right bottom corner in Properties. Find Dock and change it from None to Top.
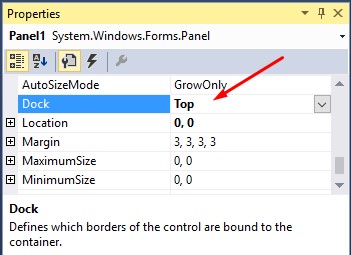
Now you will have the following view.

In this panel we will insert the buttons: Navigate, Refresh, Back and Forward.
5) Insert 4 buttons in the panel and put the following properties for each of them!
Button1 - .Name = btnNavigate ; .Text = Navigate
Button2 - .Name = btnRefresh ; .Text = Refresh
Button3 - .Name = btnBack ; .Text = Back
Button4 - .Name = btnForward ; .Text = Forward
After you inserted everything you will have the following view.

6) Now insert WebBrowser control from the Toolbox. Insert it bellow the panel.

I believe you noticed that immediately after you inserted the WebBrowser control, the control automatically docked up to the panel. That's why we inserted the panel.
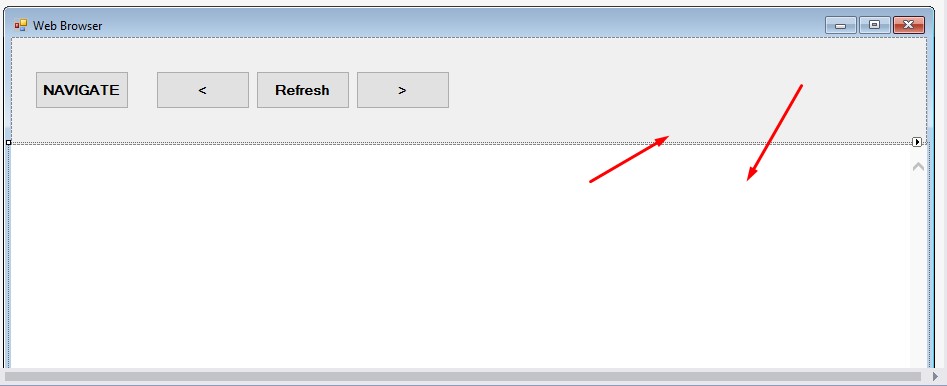
7) Now we need a TextBox control to use it as an URL place to put for navigation. After I reorganized everything we have the following view.

8) Let write the code for each of the buttons!
Private Sub btnNavigate_Click(sender As Object, e As EventArgs) Handles btnNavigate.Click
WebBrowser1.Navigate(TextBox1.Text)
End Sub
Private Sub btnRefresh_Click(sender As Object, e As EventArgs) Handles btnRefresh.Click
WebBrowser1.Refresh(TextBox1.Text)
End Sub
Private Sub btnBack_Click(sender As Object, e As EventArgs) Handles btnBack.Click
WebBrowser1.GoBack()
End Sub
Private Sub btnForward_Click(sender As Object, e As EventArgs) Handles btnForward.Click
WebBrowser1.GoForward()
End Sub
1) Open the Visual Studio 2015 and create a new Visual Basic 2015 project.
2) Second, go in the right bottom corner in Properties and find WindowsState. Change WindowsState in Maximized. That means when you start the application will start as maximized.

3) Little bit change the width and the height of the form. Make it wider and higher.
4) I suggest inserting a panel that will be docked on Top. This is because by default WebBrowser control will cover the entire form or if you dock it maximum will be little bit more than the half form. This will not give good look of the application.
So, go in Toolbox and choose Panel.

After you insert it in the form you will get the following.
Now you will have the following view.
In this panel we will insert the buttons: Navigate, Refresh, Back and Forward.
5) Insert 4 buttons in the panel and put the following properties for each of them!
Button1 - .Name = btnNavigate ; .Text = Navigate
Button2 - .Name = btnRefresh ; .Text = Refresh
Button3 - .Name = btnBack ; .Text = Back
Button4 - .Name = btnForward ; .Text = Forward
After you inserted everything you will have the following view.
I believe you noticed that immediately after you inserted the WebBrowser control, the control automatically docked up to the panel. That's why we inserted the panel.
7) Now we need a TextBox control to use it as an URL place to put for navigation. After I reorganized everything we have the following view.
8) Let write the code for each of the buttons!
Private Sub btnNavigate_Click(sender As Object, e As EventArgs) Handles btnNavigate.Click
WebBrowser1.Navigate(TextBox1.Text)
End Sub
Private Sub btnRefresh_Click(sender As Object, e As EventArgs) Handles btnRefresh.Click
WebBrowser1.Refresh(TextBox1.Text)
End Sub
Private Sub btnBack_Click(sender As Object, e As EventArgs) Handles btnBack.Click
WebBrowser1.GoBack()
End Sub
Private Sub btnForward_Click(sender As Object, e As EventArgs) Handles btnForward.Click
WebBrowser1.GoForward()
End Sub
Saturday, September 17, 2016
ListBox Complete Tutorial - Visual Basic 2015
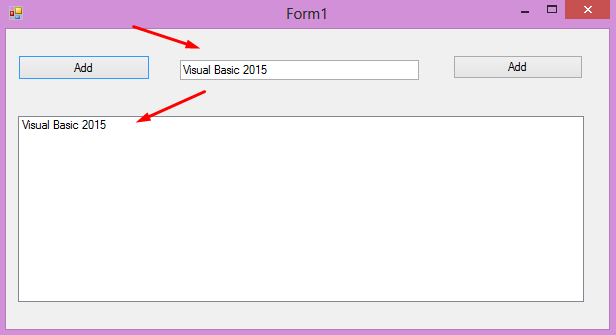
Add data from TextBox into ListBox in Visual Basic 2015
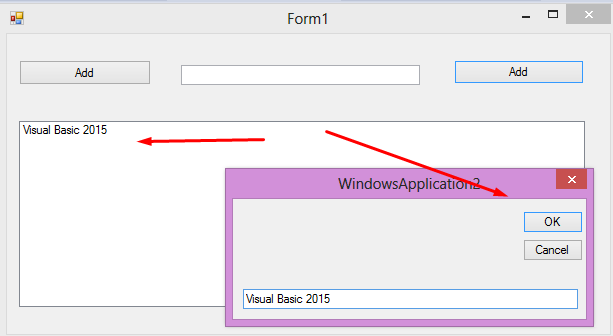
Put one button into the form and title it "Add", Property Name btnAdd. In this button we can put the code. There are several ways to program this button to add data from the textbox into the listbox control.
Private Sub btnAdd_Click(sender As Object, e As EventArgs) Handles btnAdd.Click
ListBox1.Items.Add(TextBox1.Text)
End Sub
Private Sub btnAdd_Click(sender As Object, e As EventArgs) Handles btnAdd.Click
Dim txtboxinfo As String
txtboxinfo = TextBox1.Text
ListBox1.Items.Add(txtboxinfo)
End Sub
Add numbers from 1 to 20 in ListBox control in Visual Basic 2015
Private Sub btnAdd_Click(sender As Object, e As EventArgs) Handles btnAdd.ClickDim i As Integer
For i = 1 To 20
ListBox1.Items.Add(i)
Next
End Sub
Make summary of all items in ListBox and show the results in a TextBox
Private Sub btnSum_Click(sender As Object, e As EventArgs) Handles btnSum.Click
Dim sum As Double
For x As Integer = 0 To ListBox1.Items.Count - 1
sum += CDbl(ListBox1.Items(x))
Next
TextBox1.Text = sum.ToString
End Sub
Presenting the data can be done even in the ListBox. Usually I am not adding them in the listbox just to do not make difficulties if I have to use the Listbox items again.
Private Sub btnSum_Click(sender As Object, e As EventArgs) Handles btnSum.Click
Dim sum As Double
For x As Integer = 0 To ListBox1.Items.Count - 1
sum += CDbl(ListBox1.Items(x))
Next
ListBox1.Items.Add(sum.ToString)
End Sub
Delete selected item from ListBox control in Visual Basic 2015
Private Sub btnDelete_Click(sender As Object, e As EventArgs) Handles Delete.Click
Dim itemfordeletion
itemfordeletion = ListBox1.SelectedItem
ListBox1.Items.Remove(itemfordeletion)
End Sub
Transfer data from ListBox1 to ListBox2 in Visual Basic 2015
Private Sub btnTransfer_Click(sender As Object, e As EventArgs) Handles btnTransfer.Click
Dim i As Integer
For i = 0 To ListBox1.Items.Count - 1
ListBox2.Items.Add(ListBox1.Items(i))
Next
End Sub
If you want to clear the listbox1 after all data are transferred into the listbox1 2 you need to apply the following code at the end.
Private Sub btnTransfer_Click(sender As Object, e As EventArgs) Handles btnTransfer.Click
Dim i As Integer
For i = 0 To ListBox1.Items.Count - 1
ListBox2.Items.Add(ListBox1.Items(i))
Next
ListBox1.Items.Clear()
End Sub
So I isolate the code to clear all listbox if necessary.
Private Sub btnClear_Click(sender As Object, e As EventArgs) Handles btnClear.Click
ListBox1.Items.Clear()
End Sub
Search for an item in ListBox
Private Sub btnFind_Click(sender As Object, e As EventArgs) Handles btnFind.Click
Dim index As Integer = ListBox1.FindString(TextBox1.Text)
If index <> -1 Then
ListBox1.SetSelected(index, True)
Else
MessageBox.Show("We didn't find any item in the ListBox", "No item", MessageBoxButtons.OK)
End If
End Sub
Open Text File in ListBox
First you have to insert the code:
Imports System.IO
Private Sub btnOpenTextFile_Click(sender As Object, e As EventArgs) Handles btnOpenTextFile.Click
Dim OpenFileDialog1 As New OpenFileDialog
OpenFileDialog1.FileName = ""
OpenFileDialog1.Filter = "Text Files (*.txt)|*.txt|All Files (*.*)|*.*"
If OpenFileDialog1.ShowDialog() = DialogResult.OK Then
Dim lines = File.ReadAllLines(OpenFileDialog1.FileName)
ListBox1.Items.Clear()
ListBox1.Items.AddRange(lines)
End If
End Sub
Save ListBox items in Text File
Private Sub btnSave_Click(sender As Object, e As EventArgs) Handles btnSave.Click
Dim SaveFileDialog1 As New SaveFileDialog
SaveFileDialog1.FileName = ""
SaveFileDialog1.Filter = "Text Files (*.txt)|*.txt|All Files (*.*)|*.*"
If SaveFileDialog1.ShowDialog() = DialogResult.OK Then
Dim sb As New System.Text.StringBuilder()
For Each o As Object In ListBox1.Items
sb.AppendLine(o)
Next
System.IO.File.WriteAllText(SaveFileDialog1.FileName, sb.ToString())
End If
End Sub


Open Text File in ListBox control in Visual Basic 2015
You can open text file in ListBox control in Visual Basic 215 on many ways. In this post I share the way of opening text file line by line.
First you have to add the following code!
Imports System.IO
After add the code to the button Open file.
Private Sub Button1_Click(sender As Object, e As EventArgs) Handles Button1.Click
Dim OpenFileDialog1 As New OpenFileDialog
If OpenFileDialog1.ShowDialog() = DialogResult.OK Then
Dim lines = File.ReadAllLines(OpenFileDialog1.FileName)
ListBox1.Items.Clear()
ListBox1.Items.AddRange(lines)
End If
End Sub
When you open the file it looks like the image bellow.
You can check my other posts about ListBox:
- Insert data from TextBox and InputBox into ListBox
- Delete Selected Item from ListBox in Visual Basic 2015
 |
| Test text file |
First you have to add the following code!
Imports System.IO
After add the code to the button Open file.
Private Sub Button1_Click(sender As Object, e As EventArgs) Handles Button1.Click
Dim OpenFileDialog1 As New OpenFileDialog
If OpenFileDialog1.ShowDialog() = DialogResult.OK Then
Dim lines = File.ReadAllLines(OpenFileDialog1.FileName)
ListBox1.Items.Clear()
ListBox1.Items.AddRange(lines)
End If
End Sub
When you open the file it looks like the image bellow.
 |
| Open text file in ListBox |
You can check my other posts about ListBox:
- Insert data from TextBox and InputBox into ListBox
- Delete Selected Item from ListBox in Visual Basic 2015
Thursday, September 15, 2016
ProgressBar control in Visual Basic 2015
 |
| ProgressBar |
Simple test of ProgressBar in Visual Basic 2015.
Private Sub Button2_Click(sender As Object, e As EventArgs) Handles Button2.Click
Dim x As Integer = 0
ProgressBar1.Minimum = 0
ProgressBar1.Maximum = 100
For x = 0 To 100
ProgressBar1.Value = x
Next
End Sub
Delete Selected Item from ListBox in Visual Basic 2015
To delete selected item from listbox you need to use the following code.
Private Sub btnDelete_Click(sender As Object, e As EventArgs) Handles Delete.Click
Dim itemfordeletion
itemfordeletion = ListBox1.SelectedItem
ListBox1.Items.Remove(itemfordeletion)
End Sub
Private Sub btnDelete_Click(sender As Object, e As EventArgs) Handles Delete.Click
Dim itemfordeletion
itemfordeletion = ListBox1.SelectedItem
ListBox1.Items.Remove(itemfordeletion)
End Sub
Wednesday, September 14, 2016
Insert data from TextBox and InputBox into ListBox
Insert data from TextBox into ListBox in Visual Basic 2015
PrivateSub btnAdd_Click(sender AsObject, e AsEventArgs) Handles btnAdd.Click
ListBox1.Items.Add(TextBox1.Text)
End Sub
Insert data from InputBox into ListBox in Visual Basic 2015
Private Sub Button2_Click(sender As Object, e As EventArgs) Handles Button2.Click
Dim myitemdata
myitemdata = InputBox(“Enter your Item”)
ListBox1.Items.Add(myitemdata)
End Sub
My Previews tutorial: Working with TextBox control in Visual Basic 2015
Tuesday, September 13, 2016
Working with TextBox control in Visual Basic 2015
In this tutorial I will create simple note taking software. Here I will cover all basic aspects of working with TextBox control in Visual Basic 2015.
Create the form as on the picture bellow!
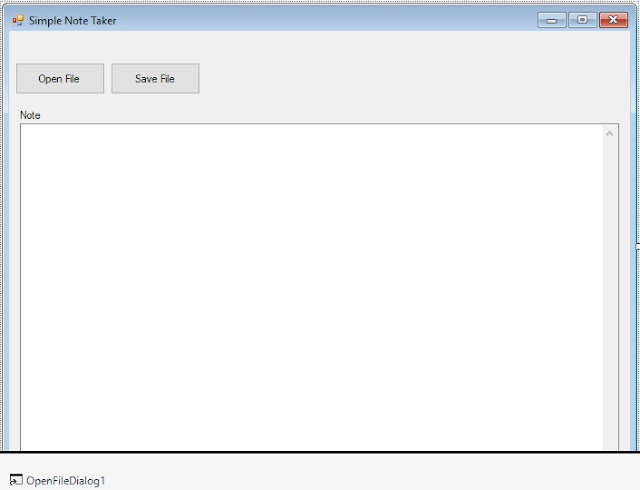
Controls properties are following:
TextBox1: .Name = txtNote .ScrollBars = Vertical
Button1: .Name = btnOpen
Button2: .Name = btnSave
Open Text Files in Visual Basic 2015 TextBox Control
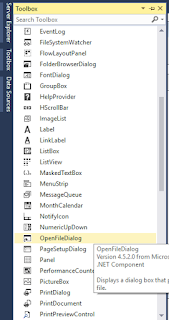
To be able to open files in TextBox control we have to add OpenFile Dialog at first. In the picture bellow you see how to add it: Toolbox - OpenFileDialog. You just click on OpenFileDialog and go in the form - somewhere, left click on it and OpenFileDialog will be inserted automatically.
Here is the code for opening Text Files in TextBox control.
Private Sub btnOpen_Click(sender As Object, e As EventArgs) Handles btnOpen.Click
Dim oReader As StreamReader
OpenFileDialog1.CheckFileExists = True
OpenFileDialog1.CheckPathExists = True
OpenFileDialog1.DefaultExt = "txt"
OpenFileDialog1.FileName = ""
OpenFileDialog1.Filter = "Text Files (*.txt)|*.txt|All Files (*.*)|*.*"
OpenFileDialog1.Multiselect = False
If OpenFileDialog1.ShowDialog = DialogResult.OK Then
oReader = New StreamReader(OpenFileDialog1.FileName, True)
txtNote.Text = oReader.ReadToEnd
End If
End Sub
Save Text File from TextBox in Visual Basic 2015
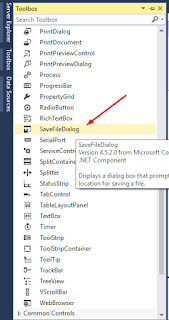
First add SaveFileDialog in the form to be able to open Save Dialog and save the content from the textbox.
Here is the code to save the content from TextBox in Text File. I also added an option to save in other extension if you wish.
Private Sub btnSave_Click(sender As Object, e As EventArgs) Handles btnSave.Click
SaveFileDialog1.DefaultExt = "txt"
SaveFileDialog1.FileName = ""
SaveFileDialog1.Filter = "Text Files (*.txt)|*.txt|All Files (*.*)|*.*"
SaveFileDialog1.FilterIndex = 2
SaveFileDialog1.RestoreDirectory = True
If SaveFileDialog1.ShowDialog() = DialogResult.OK Then
IO.File.WriteAllText(SaveFileDialog1.FileName, txtNote.Text)
End If
End Sub
Create the form as on the picture bellow!

Controls properties are following:
TextBox1: .Name = txtNote .ScrollBars = Vertical
Button1: .Name = btnOpen
Button2: .Name = btnSave
Open Text Files in Visual Basic 2015 TextBox Control
To be able to open files in TextBox control we have to add OpenFile Dialog at first. In the picture bellow you see how to add it: Toolbox - OpenFileDialog. You just click on OpenFileDialog and go in the form - somewhere, left click on it and OpenFileDialog will be inserted automatically.

Here is the code for opening Text Files in TextBox control.
Private Sub btnOpen_Click(sender As Object, e As EventArgs) Handles btnOpen.Click
Dim oReader As StreamReader
OpenFileDialog1.CheckFileExists = True
OpenFileDialog1.CheckPathExists = True
OpenFileDialog1.DefaultExt = "txt"
OpenFileDialog1.FileName = ""
OpenFileDialog1.Filter = "Text Files (*.txt)|*.txt|All Files (*.*)|*.*"
OpenFileDialog1.Multiselect = False
If OpenFileDialog1.ShowDialog = DialogResult.OK Then
oReader = New StreamReader(OpenFileDialog1.FileName, True)
txtNote.Text = oReader.ReadToEnd
End If
End Sub
Save Text File from TextBox in Visual Basic 2015
First add SaveFileDialog in the form to be able to open Save Dialog and save the content from the textbox.

Here is the code to save the content from TextBox in Text File. I also added an option to save in other extension if you wish.
Private Sub btnSave_Click(sender As Object, e As EventArgs) Handles btnSave.Click
SaveFileDialog1.DefaultExt = "txt"
SaveFileDialog1.FileName = ""
SaveFileDialog1.Filter = "Text Files (*.txt)|*.txt|All Files (*.*)|*.*"
SaveFileDialog1.FilterIndex = 2
SaveFileDialog1.RestoreDirectory = True
If SaveFileDialog1.ShowDialog() = DialogResult.OK Then
IO.File.WriteAllText(SaveFileDialog1.FileName, txtNote.Text)
End If
End Sub
Monday, September 12, 2016
Visual Basic 2015
I am doing programming in Visual Basic since Visual Basic 6. I have solid knowledge and I want to share it with my readers.
In this blog I will share Visual Basic 2015 (newest version of Microsoft Visual Basic versions) all my practices in different aspects of programming. I plan to publish posts at least 3 times in a week so in a short time I will cover most of the codes used by professional coders.
Visual Basic 2015 is very powerful programming language. It's easy to learn with clear syntax. Everyone can learn it and master it in a very short time. You need only to learn the basic codes for each control plus the ways to connect them with different databases.
I love programming in Visual Basic 2015. Also I love teaching the people how to program. I program also in Python and have other blog named Python Coding. If you are interested about Python programming you can check it. It's relatively new blog such this one.
If you have any questions about programming in Visual Basic you can write as comments or contact me trough the contact form.
Subscribe to:
Posts (Atom)